Test management tools act as a backbone for the testing process. Every testing process, be it design, execution, or defects, gets documented in test management tools. Test management tools even act as proof of the work done by the testers. The test management tool should also be feature-rich to capture all these details. In this article, we will discuss one such test management tool – Qase.
About Qase
Qase is a modern test management tool designed to help teams manage their software testing process more efficiently. It offers a complete suite of features, including detailed test case management, test execution tracking, and seamless integration with popular CI/CD and issue-tracking tools such as Jenkins, GitHub Actions, and Jira. Qase supports both manual and automated testing, allowing teams to manage their testing activities from a centralized platform. With its real-time collaboration capabilities, customizable reports, and role-based access control, Qase ensures improved communication, enhanced visibility, and streamlined workflows.
Features of Qase
Qase is packed with a wide range of features. Let’s explore them.
Test Case Management
- Create and Organize Test Cases: Qase allows users to create detailed test cases with descriptions, attachments, and custom fields. Test cases can be organized into suites for better management.
- Reusable Steps: Test steps can be reused across multiple test cases, promoting consistency and saving time.
- Bulk Operations: Perform bulk actions such as editing, deleting, or moving test cases between projects or suites efficiently.
Test Execution
- Test Runs: Users can create test runs from selected test cases or suites, assign them to testers, and monitor progress in real-time.
- Support for Manual and Automated Testing: Qase facilitates both manual and automated testing, integrating with various automation tools for seamless execution and reporting.
- Defect Tracking: Report defects directly from test runs and link them to specific test cases, streamlining defect management and resolution.
Integrations
- CI/CD Tools: Qase integrates with CI/CD tools like Jenkins, GitHub Actions, and GitLab CI, enabling automated test execution and continuous integration workflows.
- Issue Trackers: Integrate with issue-tracking systems such as Jira, Trello, and Asana to sync defects and tasks, enhancing collaboration between development and QA teams.
- Automation Frameworks: Qase supports various automation frameworks like Selenium, Cypress, and Playwright, offering flexibility in automation solutions.
Collaboration and Reporting
- Real-time Collaboration: Multiple team members can work on test cases and test runs simultaneously, with changes reflected instantly.
- Customizable Reports: Generate detailed and customizable reports on test case status, test run progress, and defect tracking to meet specific project needs.
- Dashboard: A comprehensive dashboard provides an at-a-glance view of testing activities, helping teams monitor progress and make data-driven decisions.
Benefits of Using Qase
Using Qase offers numerous benefits for QA teams and software development projects. Let’s go through a few of them.
- Streamlined Processes: Qase simplifies the management of test cases and test runs, significantly reducing the time and effort required for QA activities. The intuitive interface and powerful features enable teams to work more efficiently.
- Unified Platform: Qase provides a centralized platform for test management, which enhances communication and collaboration among team members. Real-time updates ensure that everyone is on the same page, reducing misunderstandings and errors.
- Seamless Integrations: Integration with popular development and issue-tracking tools like Jira, Trello, and GitHub Actions allows for smooth synchronization of tasks and defects, facilitating better coordination between development and QA teams.
- Real-time Insights: Comprehensive dashboards and customizable reports provide real-time insights into testing activities, allowing teams to monitor progress, identify bottlenecks, and make informed decisions quickly.
- Adaptable to Various Projects: Qase’s flexible design makes it suitable for projects of all sizes, from small teams working on simple applications to large enterprises managing complex systems. The tool can scale with the team’s needs.
Preview of Qase
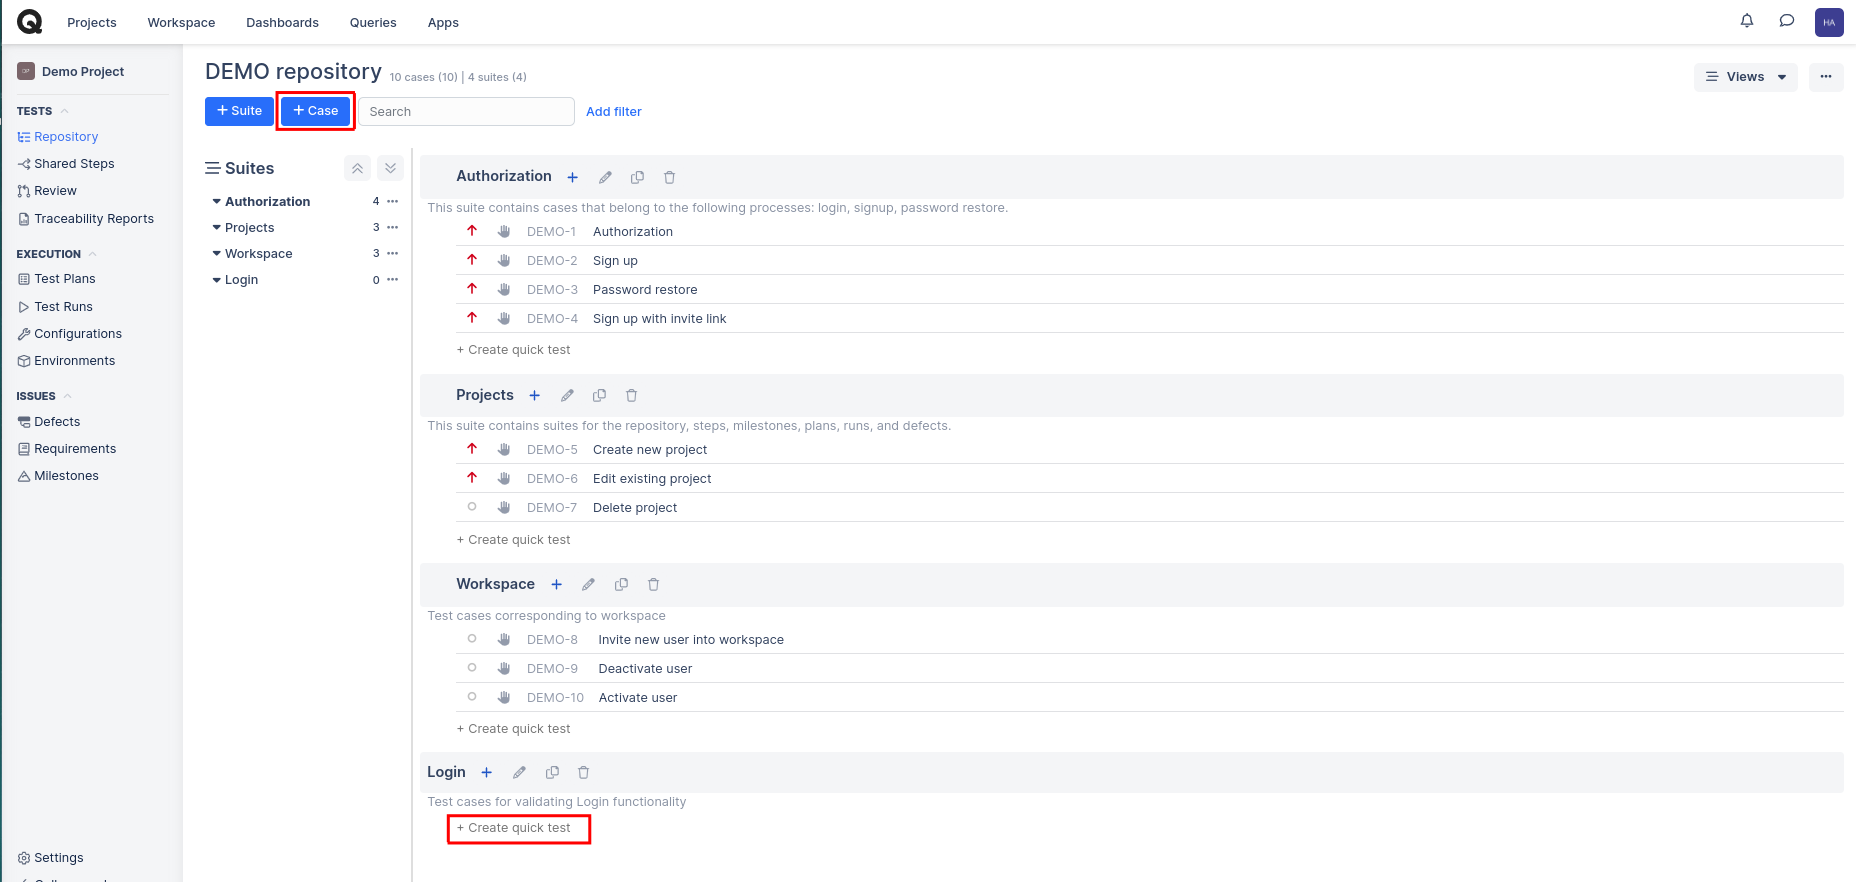
Now, let’s see how we can create a test case in Qase. Once you log in to the Qase portal, you need to select the project. The project home page will be the Repository tab showing the test suites.
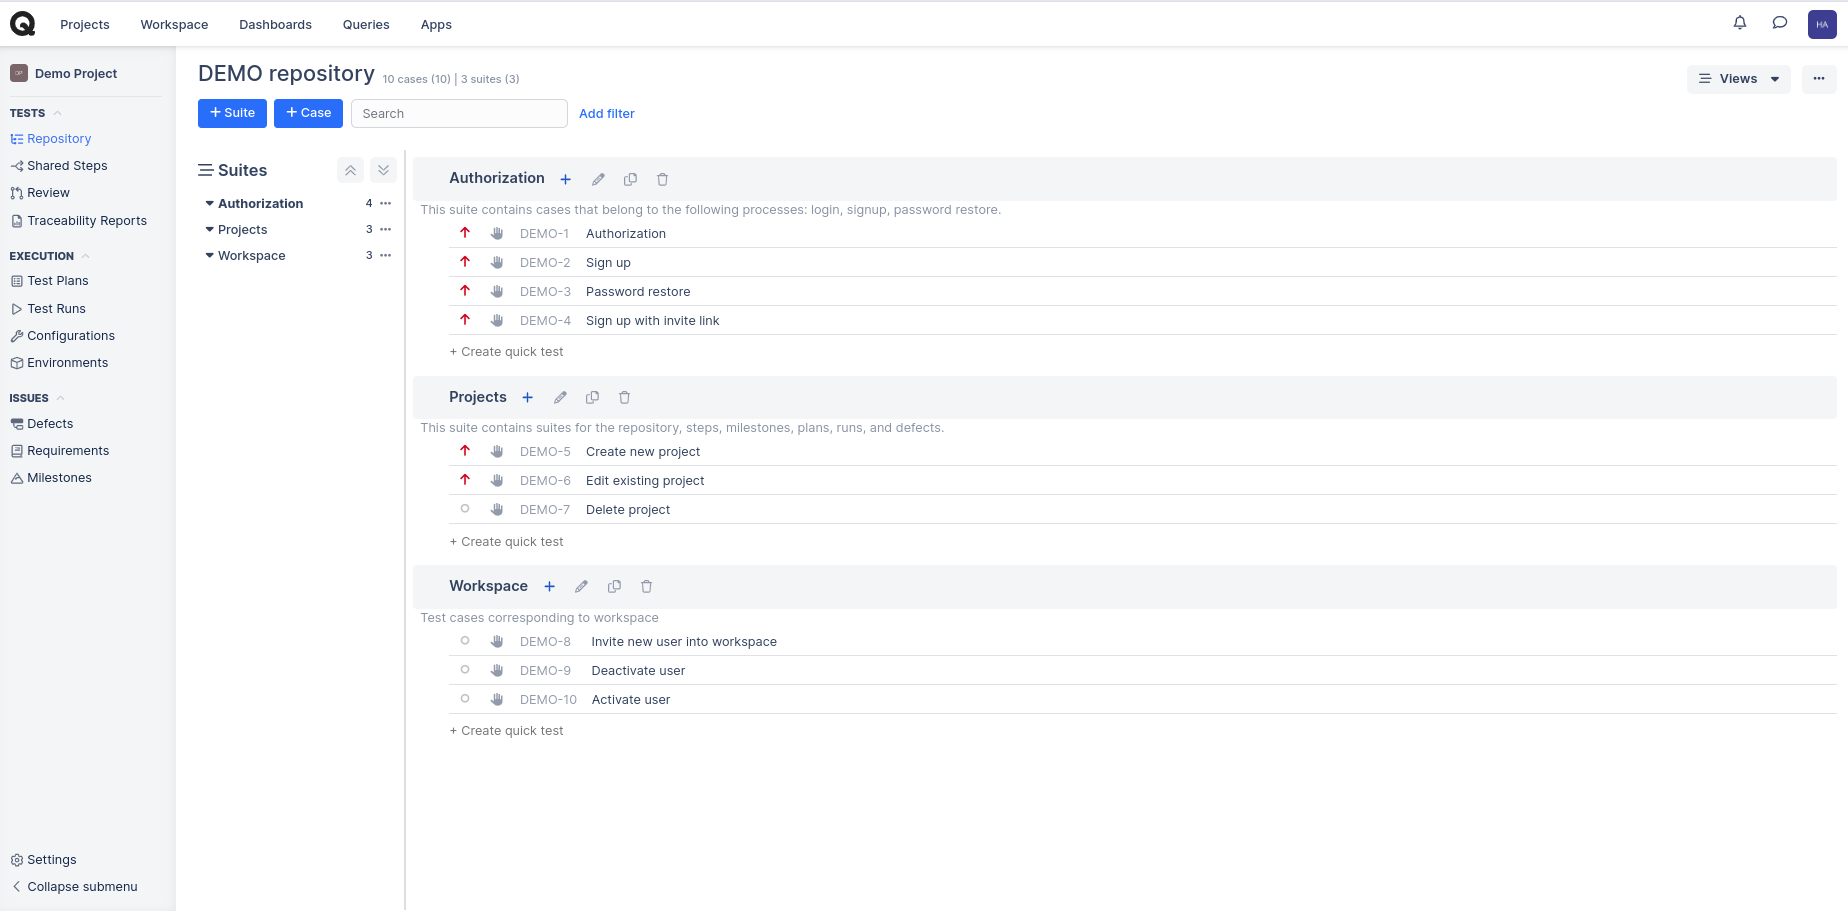
Create Test Suite
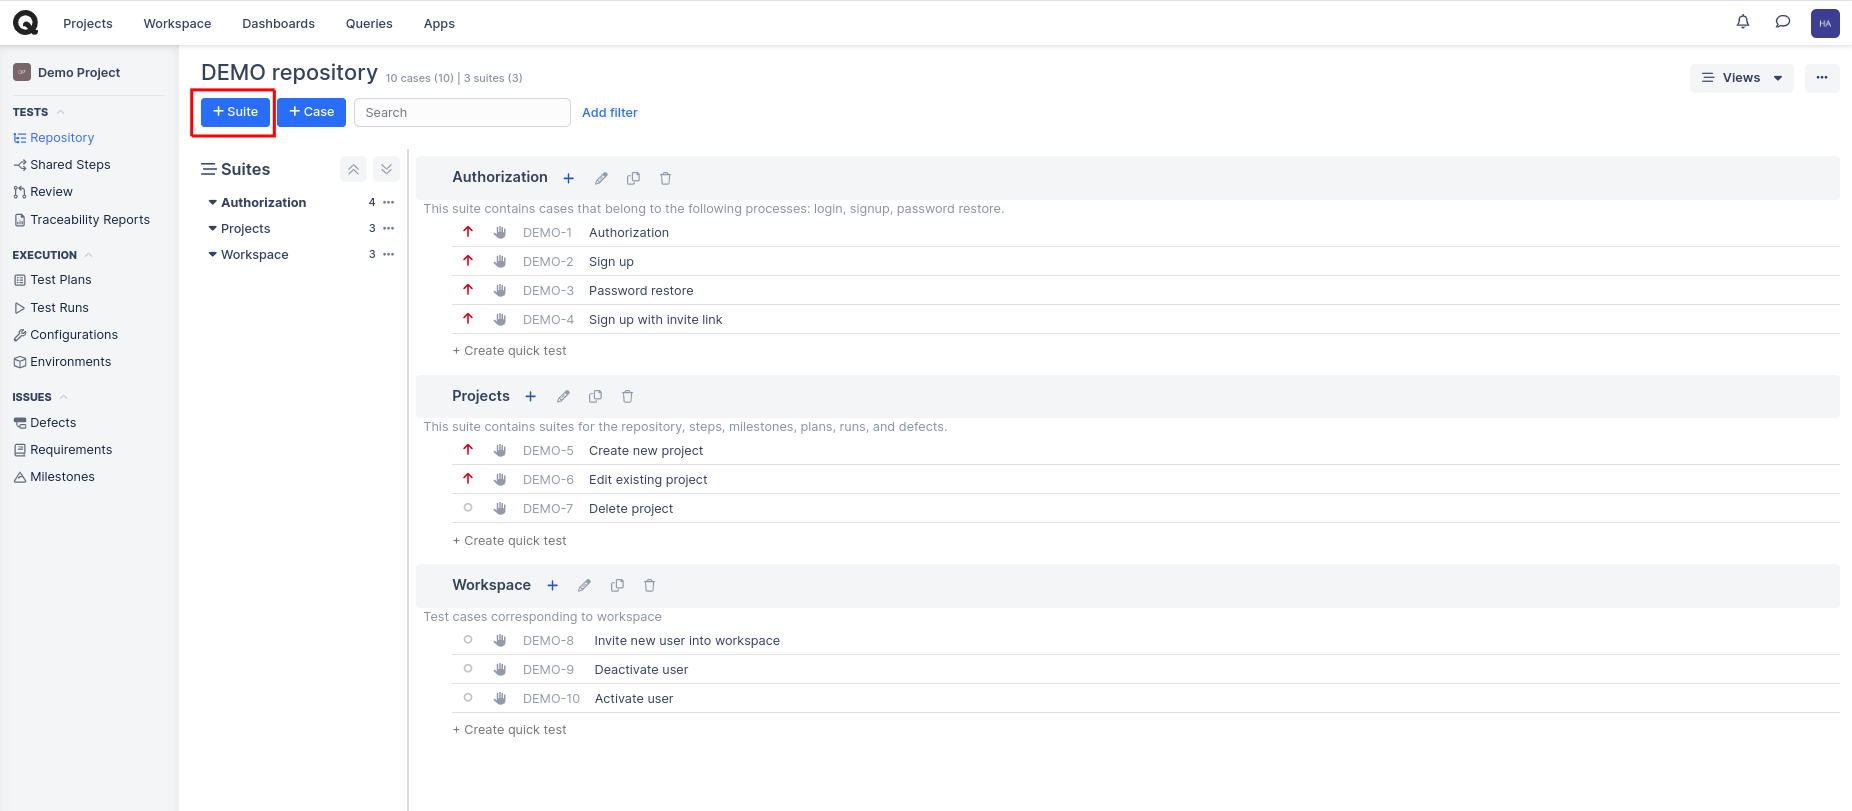
Step 1: Before creating test cases, we need to create a test suite. To create a test suite, click the “+Suite” button.
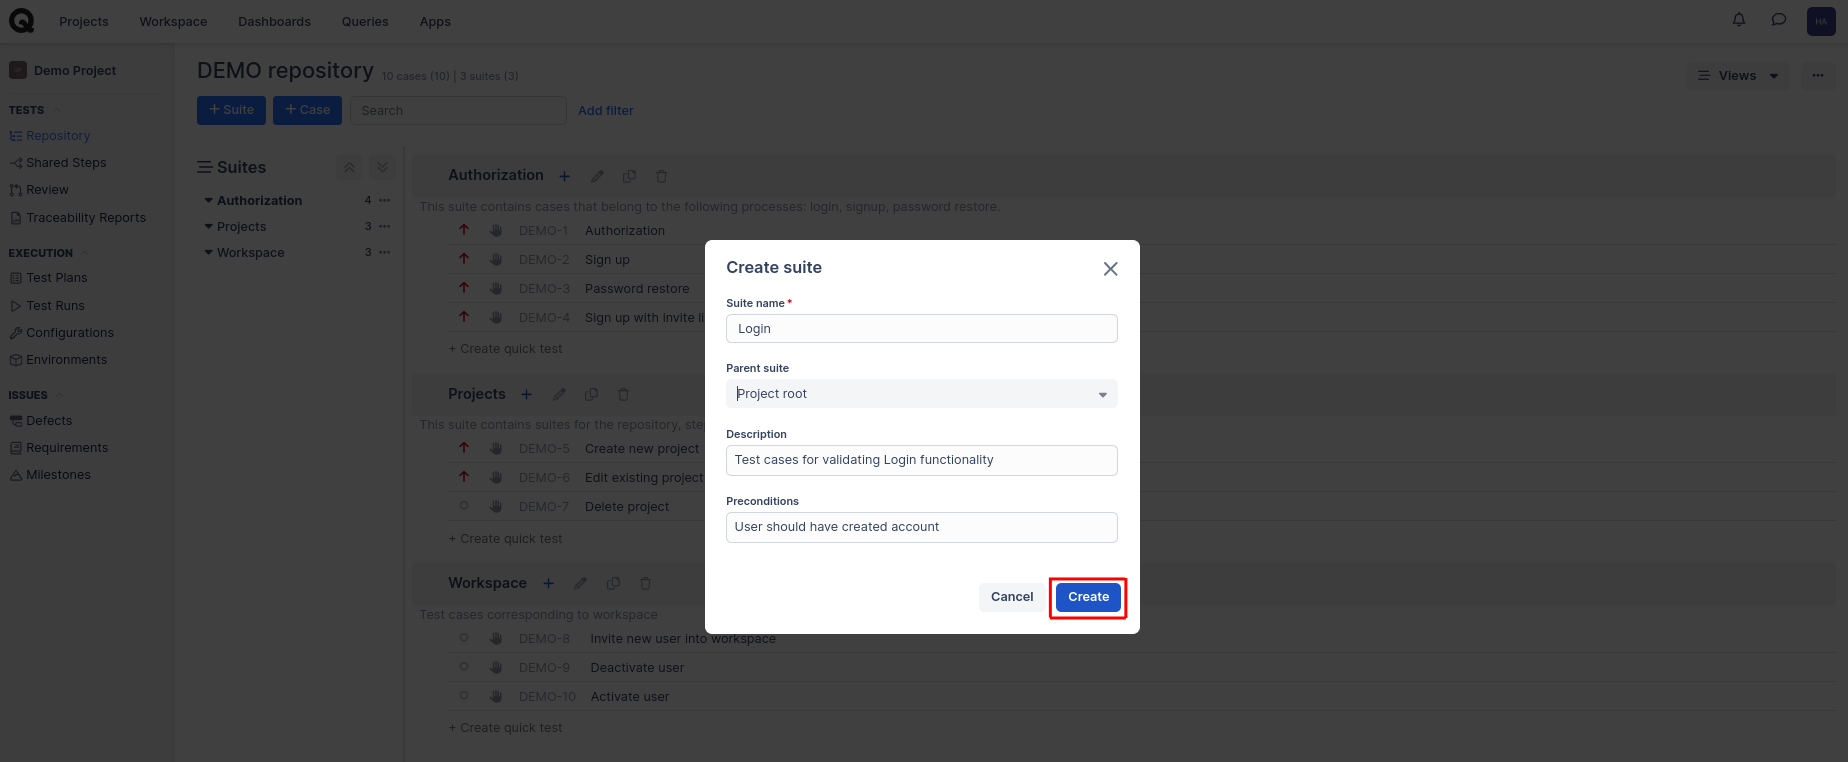
Step 2: A popup window will be displayed; you need to enter the Suite name and then select the Parent suite from the drop-down. This option is available because one suite can have sub-suites. Then Description and Precondition for executing that suite. Add the details and click Create.
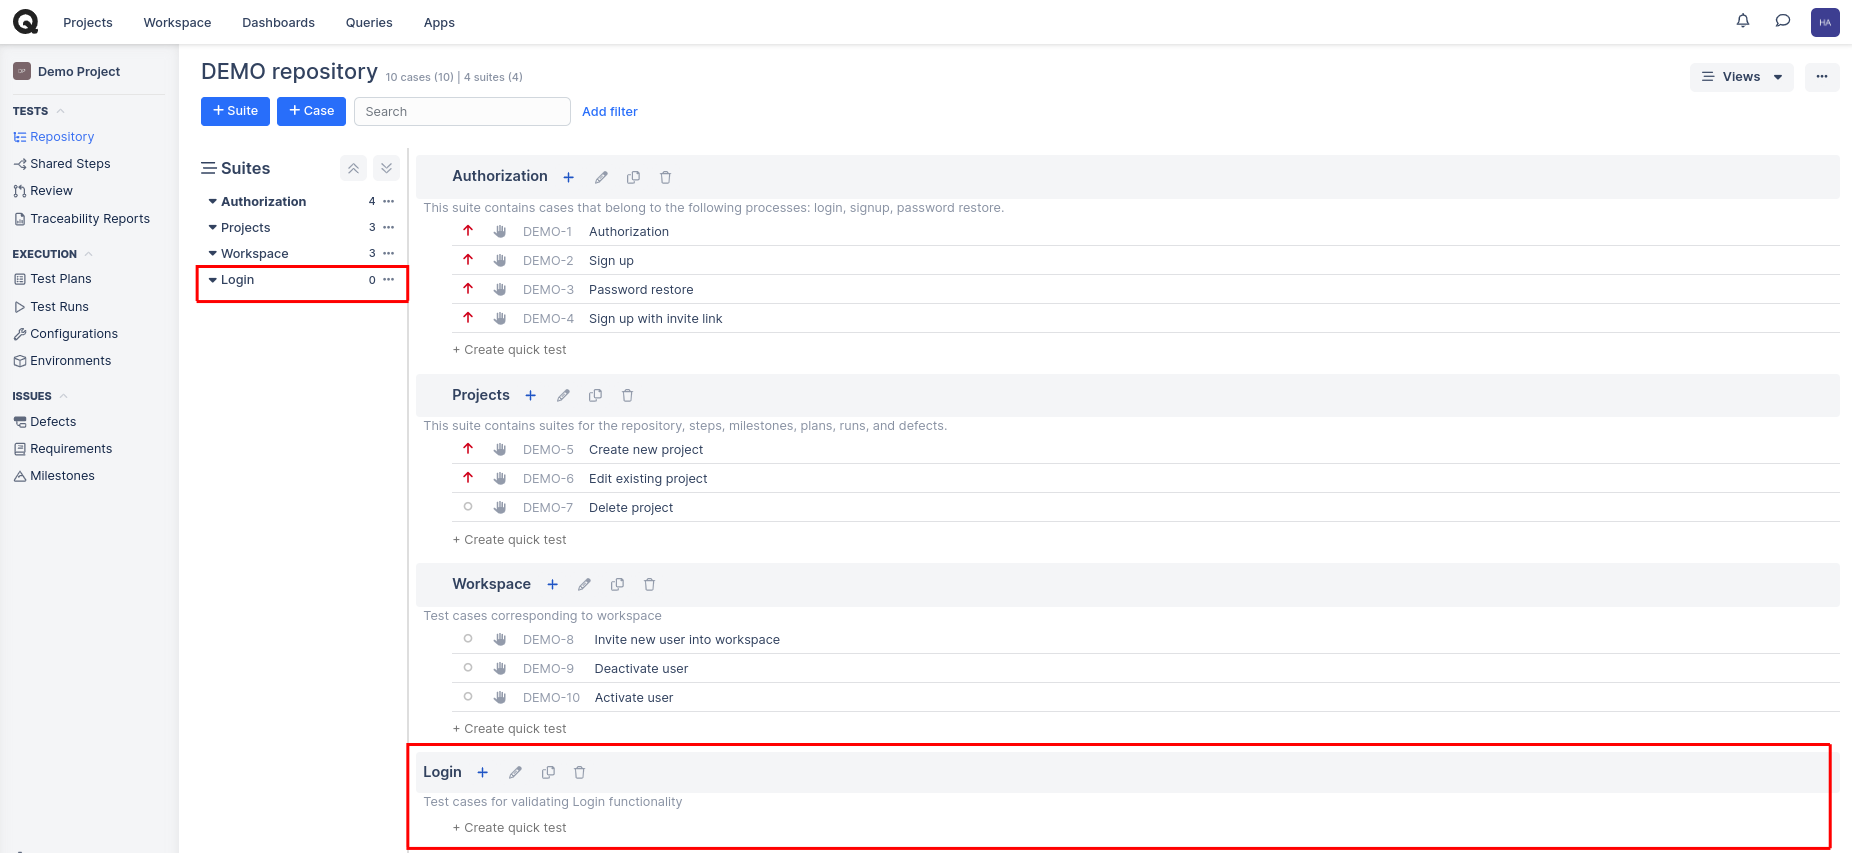
Step 3: You can see the test suite is created and can be viewed on the home page.
Create Test Case
Step 4: The next step is to add test cases for the suite. There are two options for adding test cases. The first option is to click the “+Case” on the top menu, and the second option is to click “+Create quick test” under the test suite.
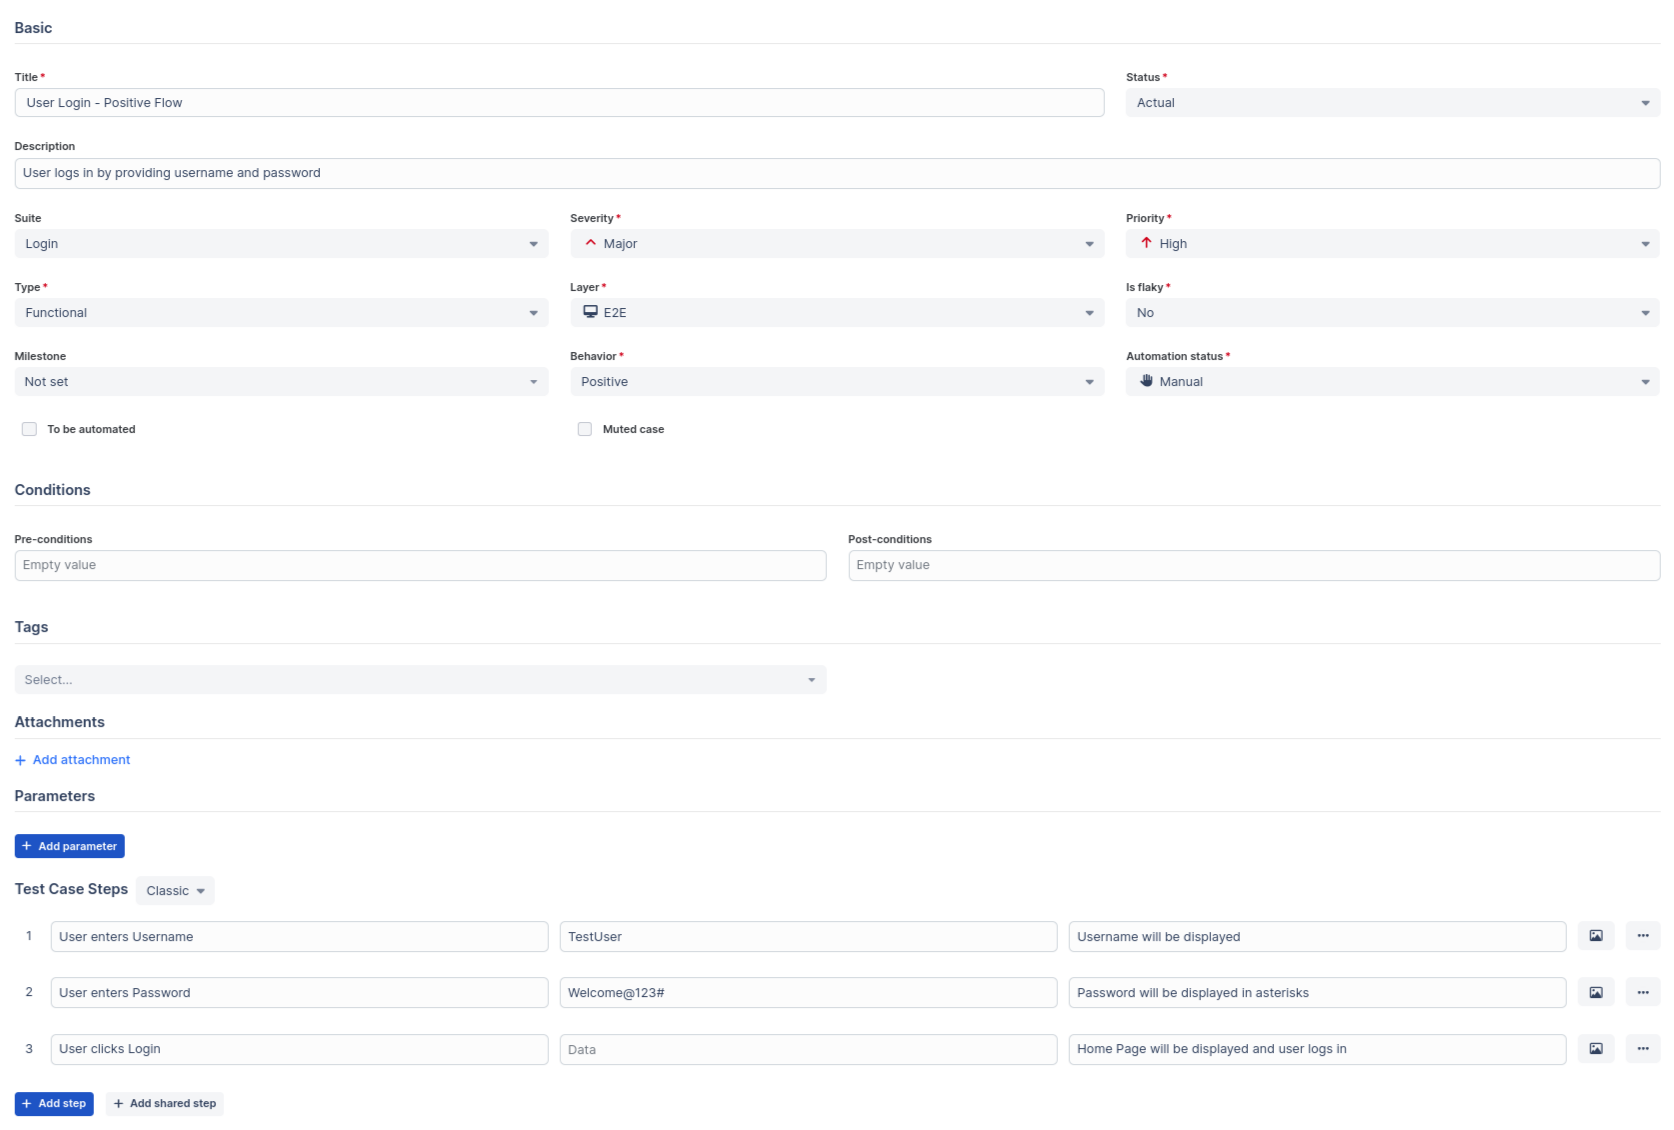
Step 5: Let us click the first option to create a test case. The test case creation page can be divided into different headers:
-
Basic: Here, we need to fill the following:
- Title: Provide a title of the test case
- Status: The test case status includes Actual for completed test cases, Draft if the test case is not complete, and Deprecated if the functionality is not in use.
- Description: Provide a description for the test case
- Suite: The suite names will be populated in the dropdown. We can even create test cases without any suite; for that, we need to select the option “Test cases without Suite” from the dropdown.
- Severity: It includes the usual values like Trivial, Minor, Normal, Major, Critical and Blocker.
- Priority: Provide the priority of execution: High, Low, and Medium.
- Type: Such as functional, smoke, regression, security, usability, performance, etc.
- Layer: We can select E2E, API, or Unit tests.
- Is Flaky: Option to choose if the test case is flaky or not.
- Milestone: The milestones we created will be populated on the dropdown.
- Behavior: We can choose whether it’s a positive, negative, or destructive scenario.
- Automation Status: If the test case is manual or automated.
- If the test case is to be automated, then we can click the checkbox – To be automated.
- If the test case is muted, click the Muted case checkbox.
- Conditions: Here, we can mention the pre-conditions and post-conditions.
- Tags: We can select the required tags from the dropdown.
- Attachments: We have the option to upload attachments
- Parameters: If we have parameters for that particular test case, we can add them here.
- Test Case Steps: Here, we can select if the test steps are in the classic model with expected and actual results field or in the Gherkins model.
- We have two options: Add new steps or add from shared steps.
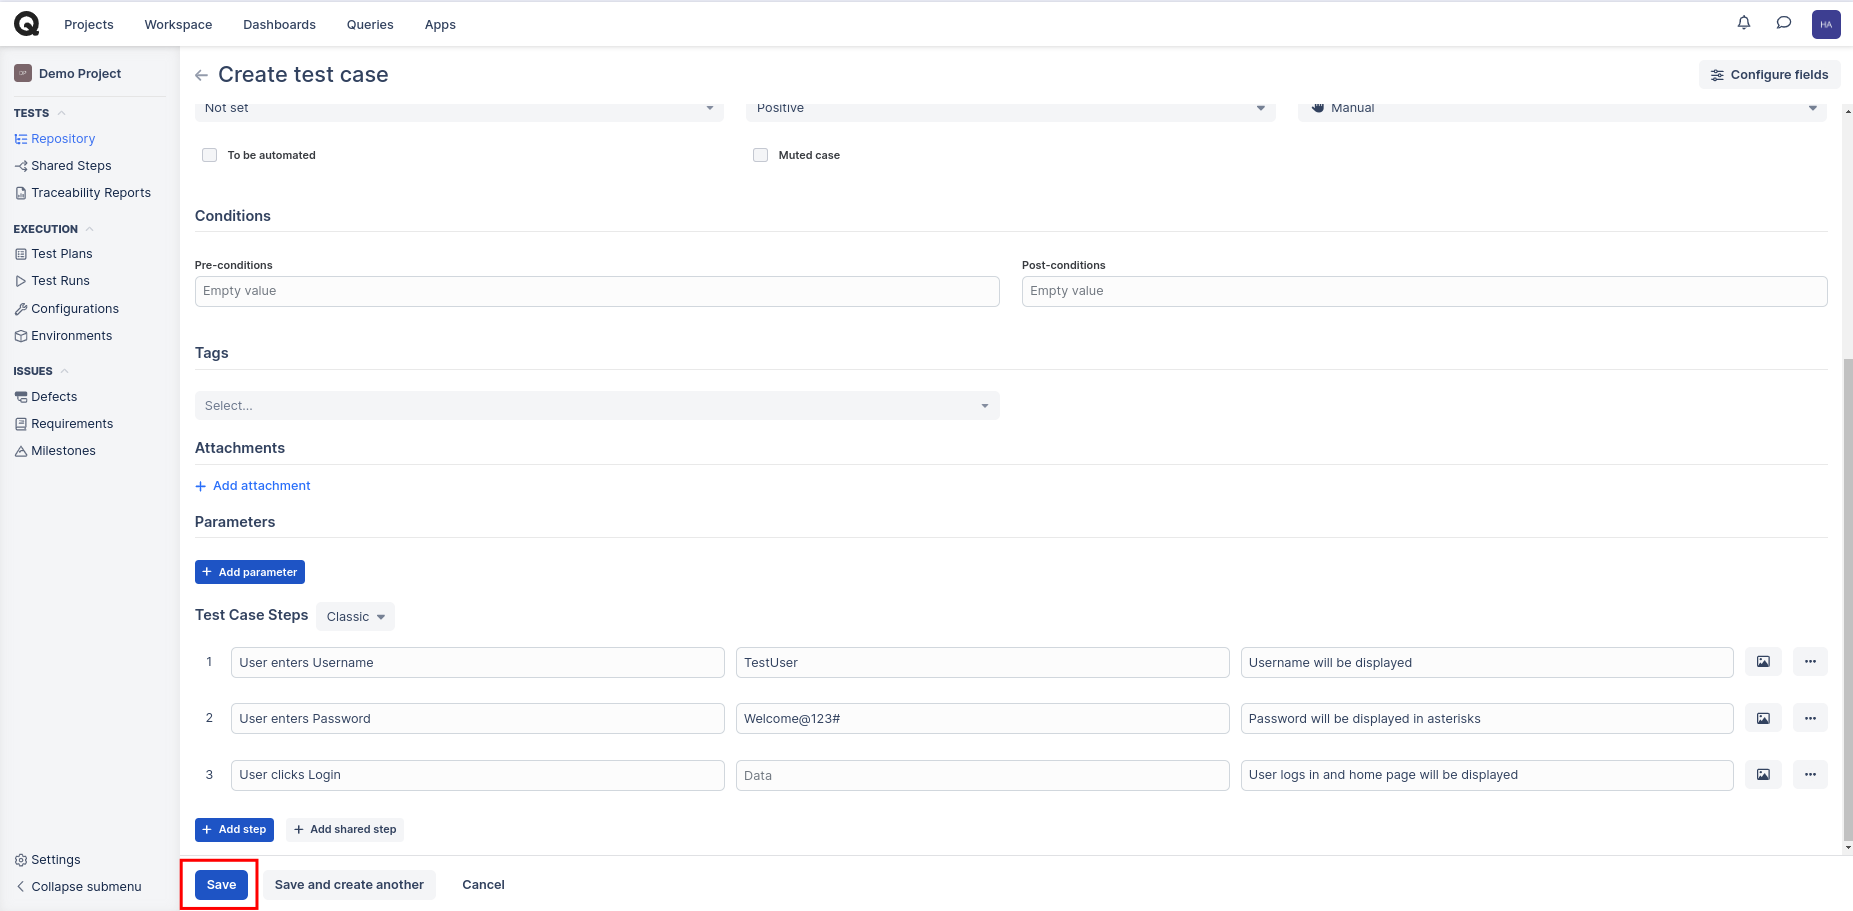
Once we complete filling this huge list, we have the option to:
- Save: To save the test case
- Save and Create another: You can save and create a new test case.
Now, let’s fill in all the details.
Step 6: After filling in the details, Click Save.
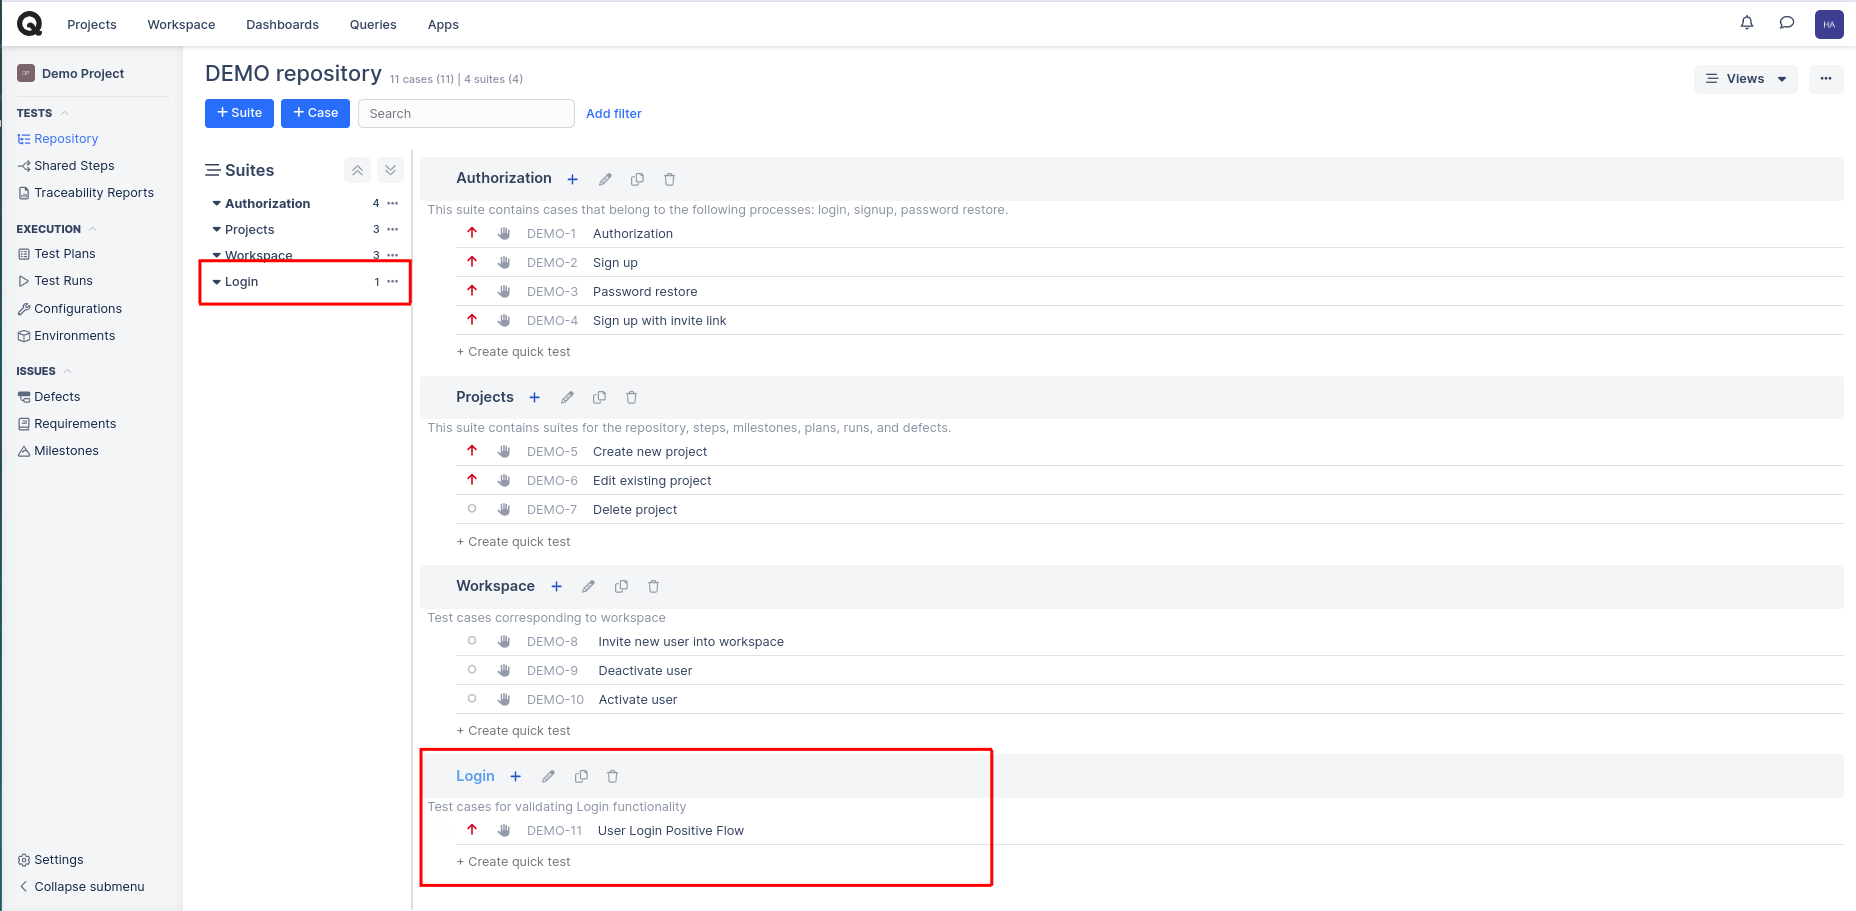
Step 7: Now you can see the test case under the test suite “Login”.
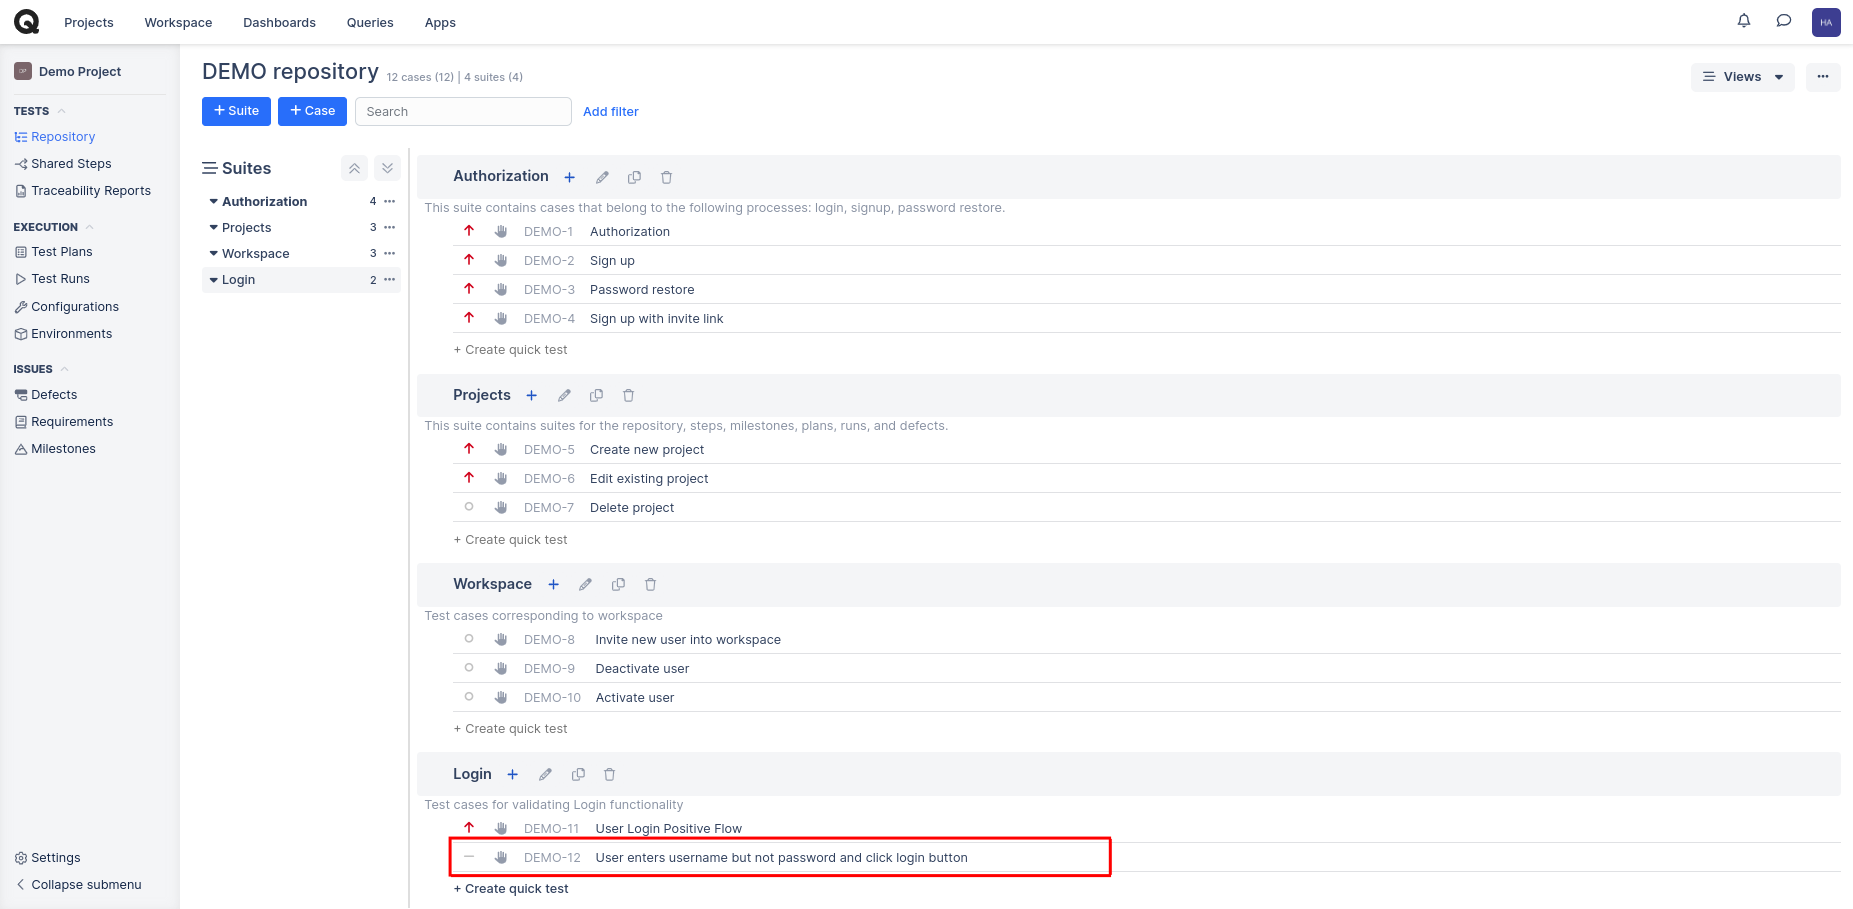
Step 8: The second option is to click the Create quick test under the test suite name.
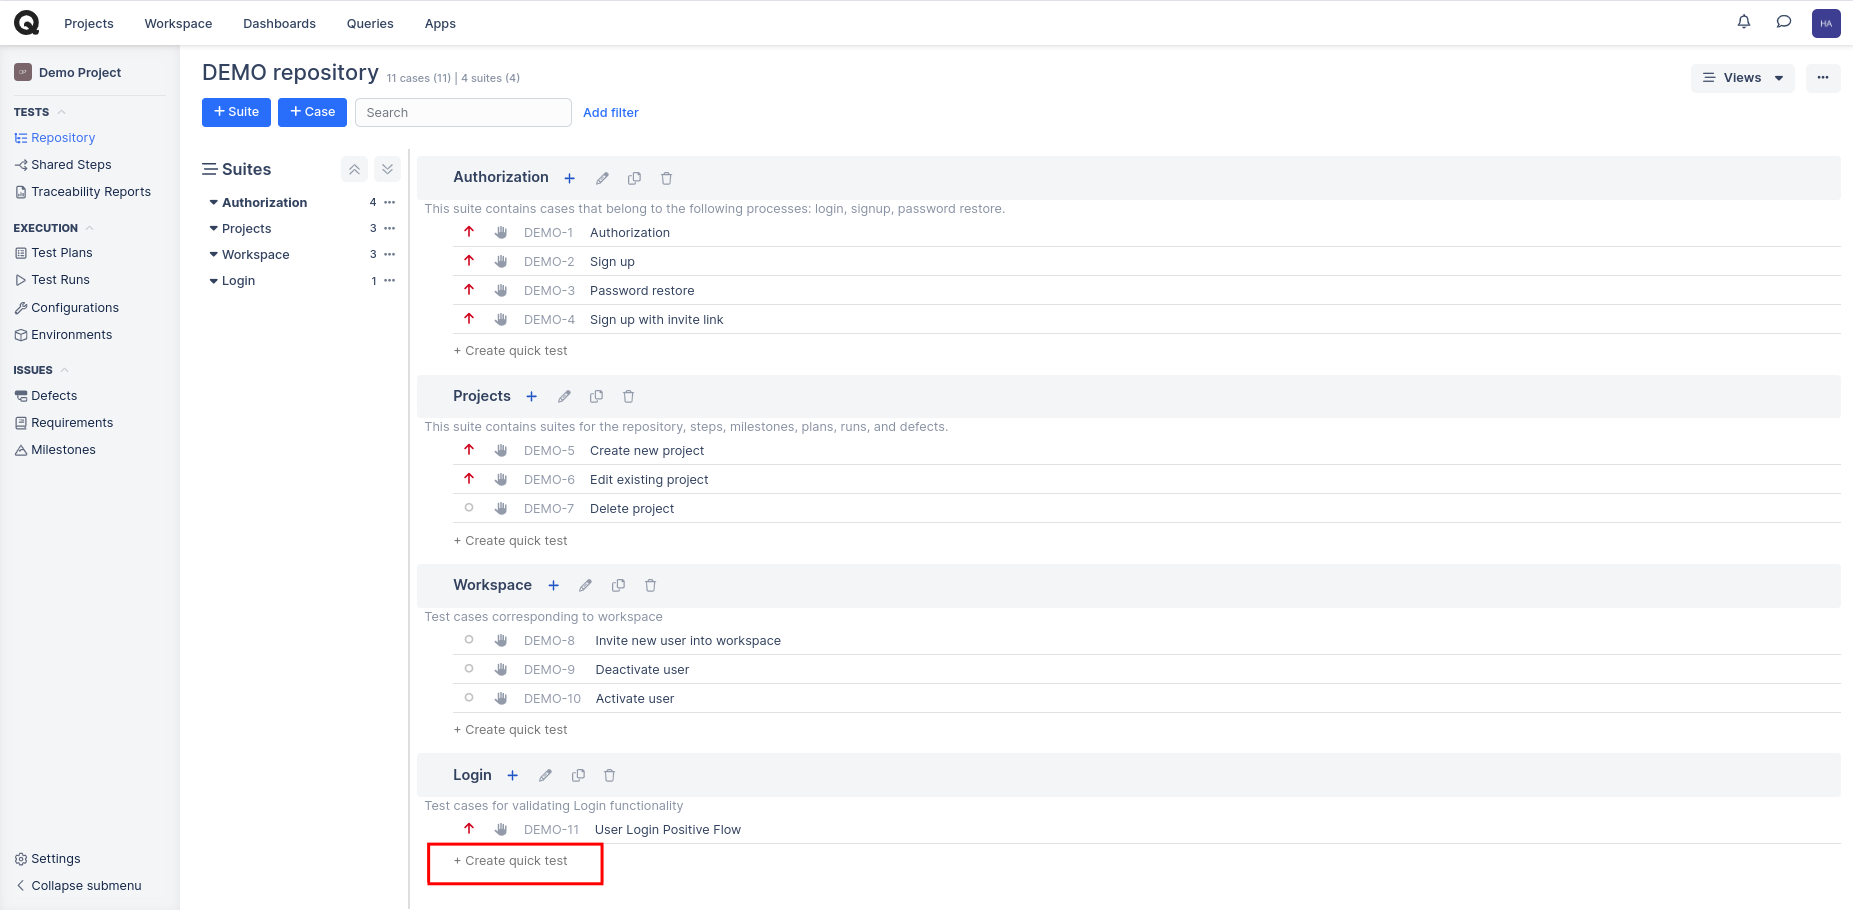
Step 9: Click Create quick test and enter the test case title. The test case will be created without any steps. You can edit the test case to add the details later.
Create Test Runs
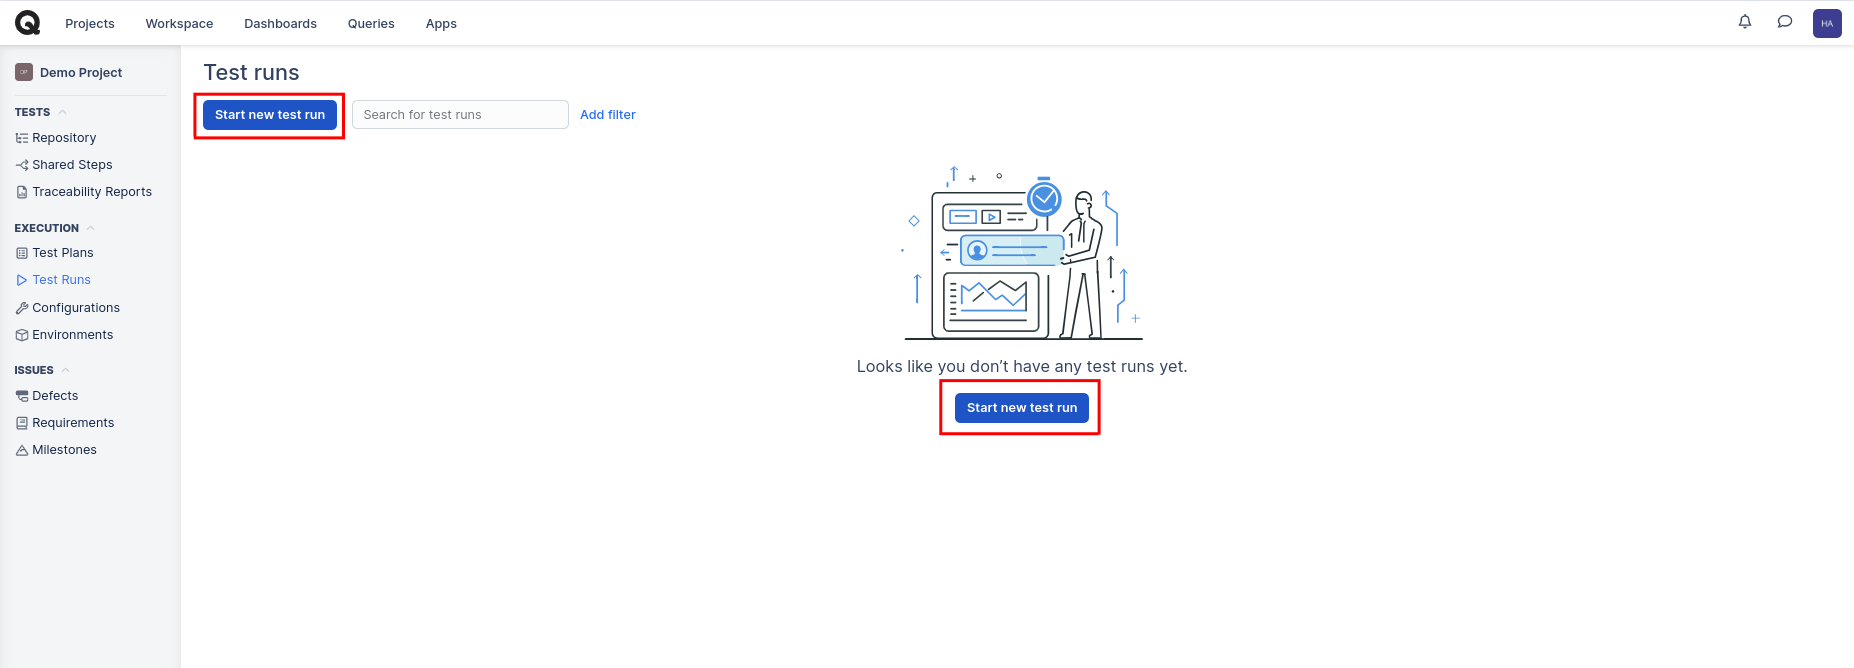
Step 10: To create a test run, click the Test Runs link on the left side menu.
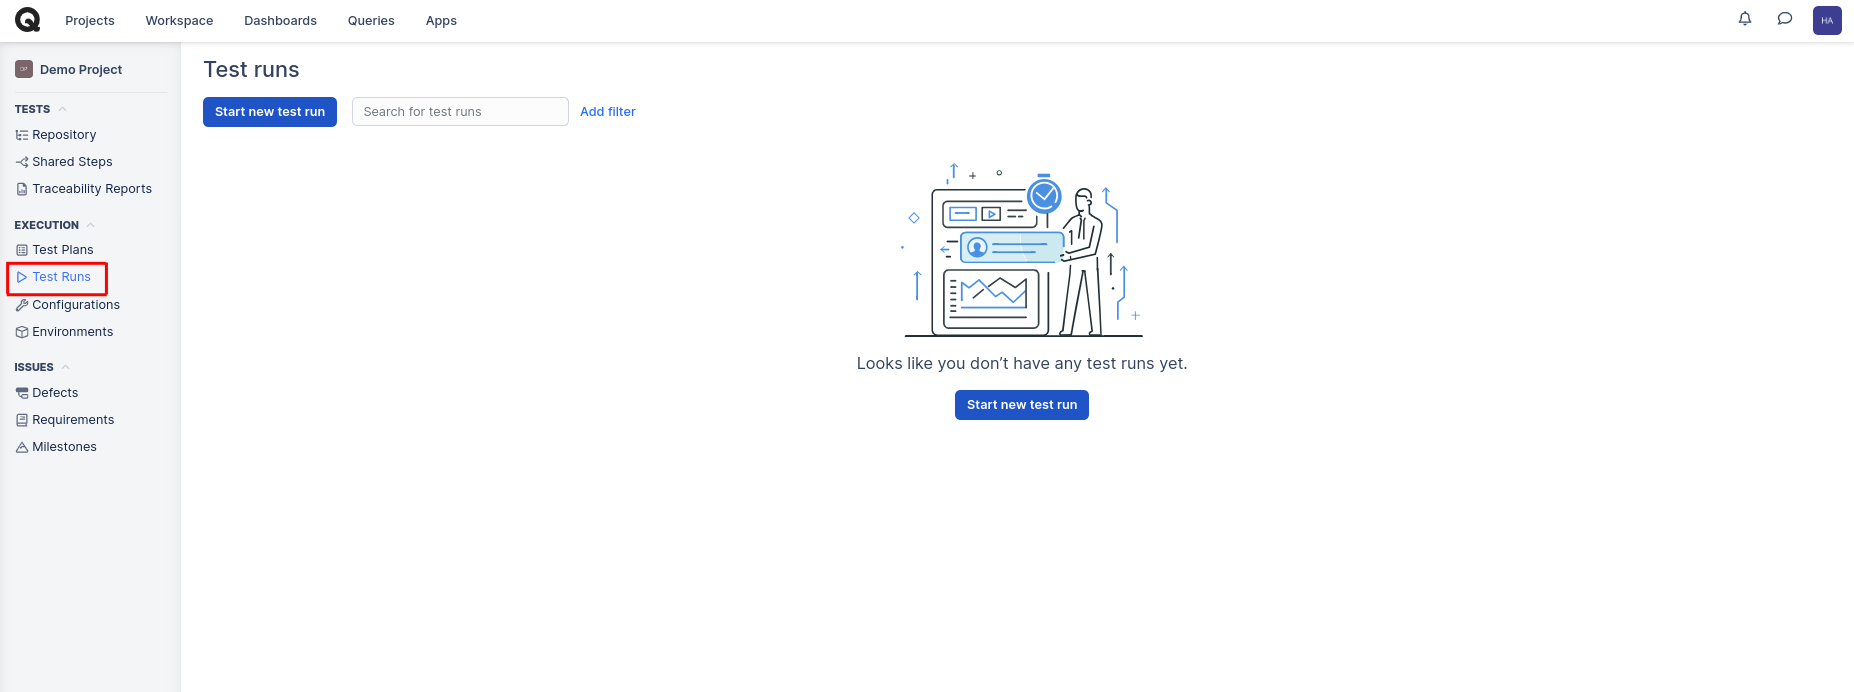
Step 11: You can create a new test run by clicking Start new test run.
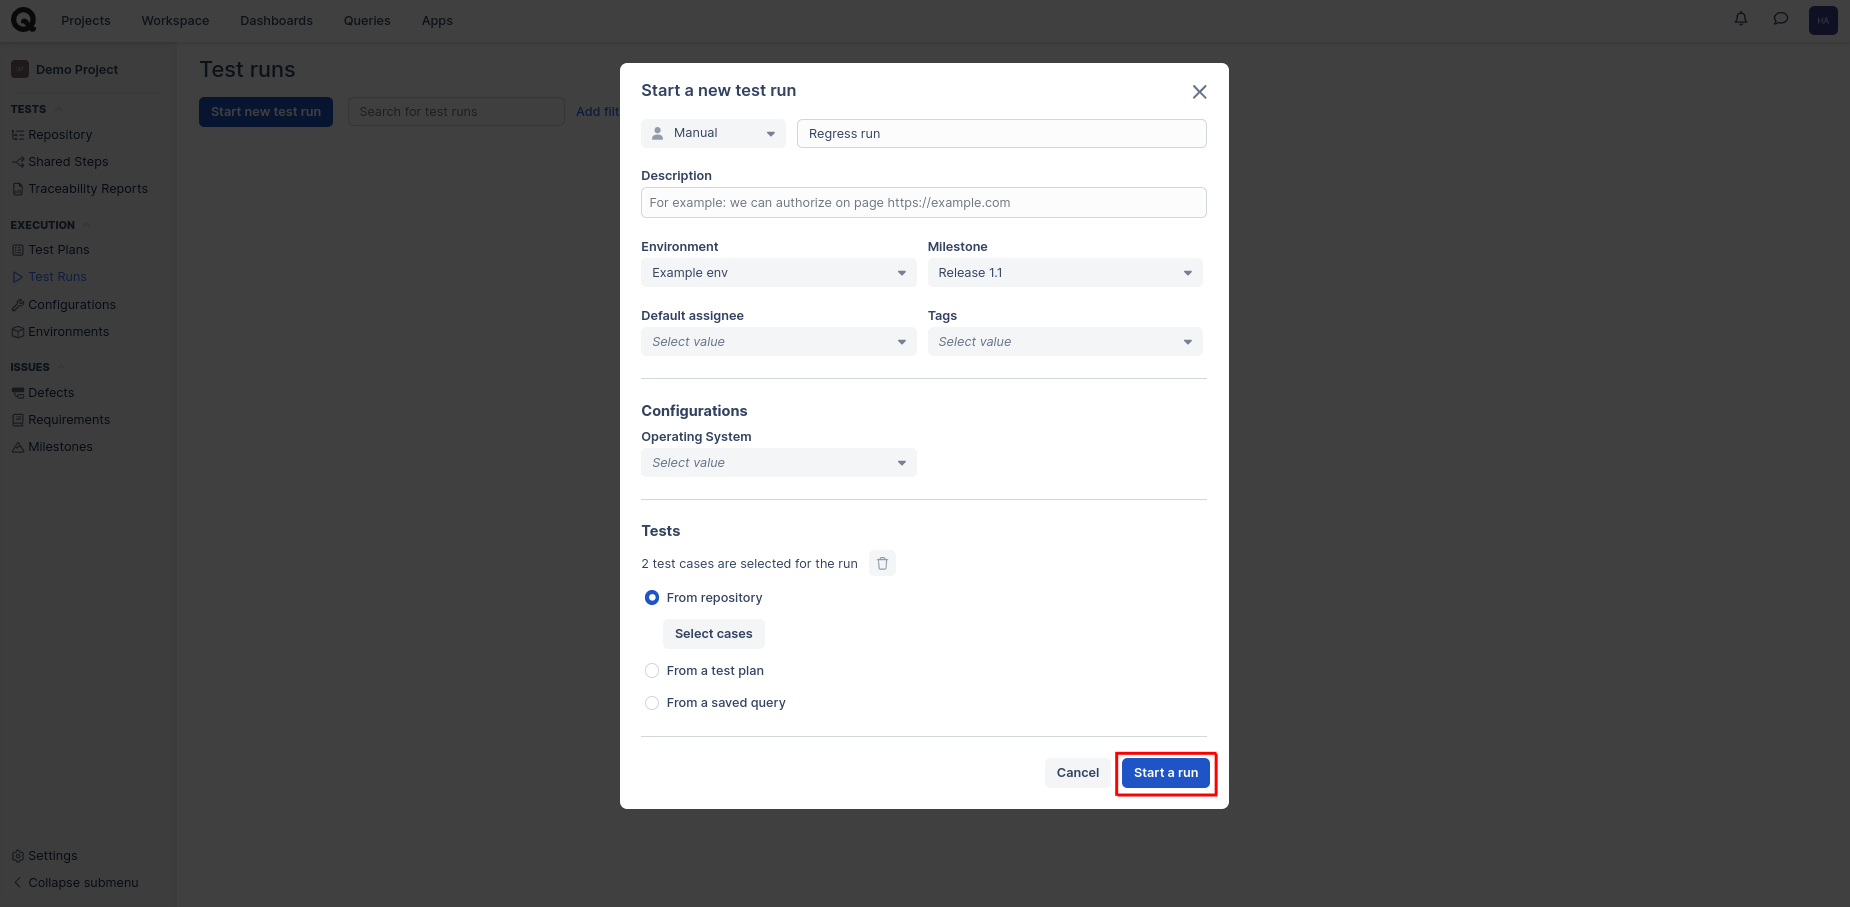
Step 12: A new popup window opens, where we can add the test run name, environment, milestone, and assignee, as well as assign test cases.
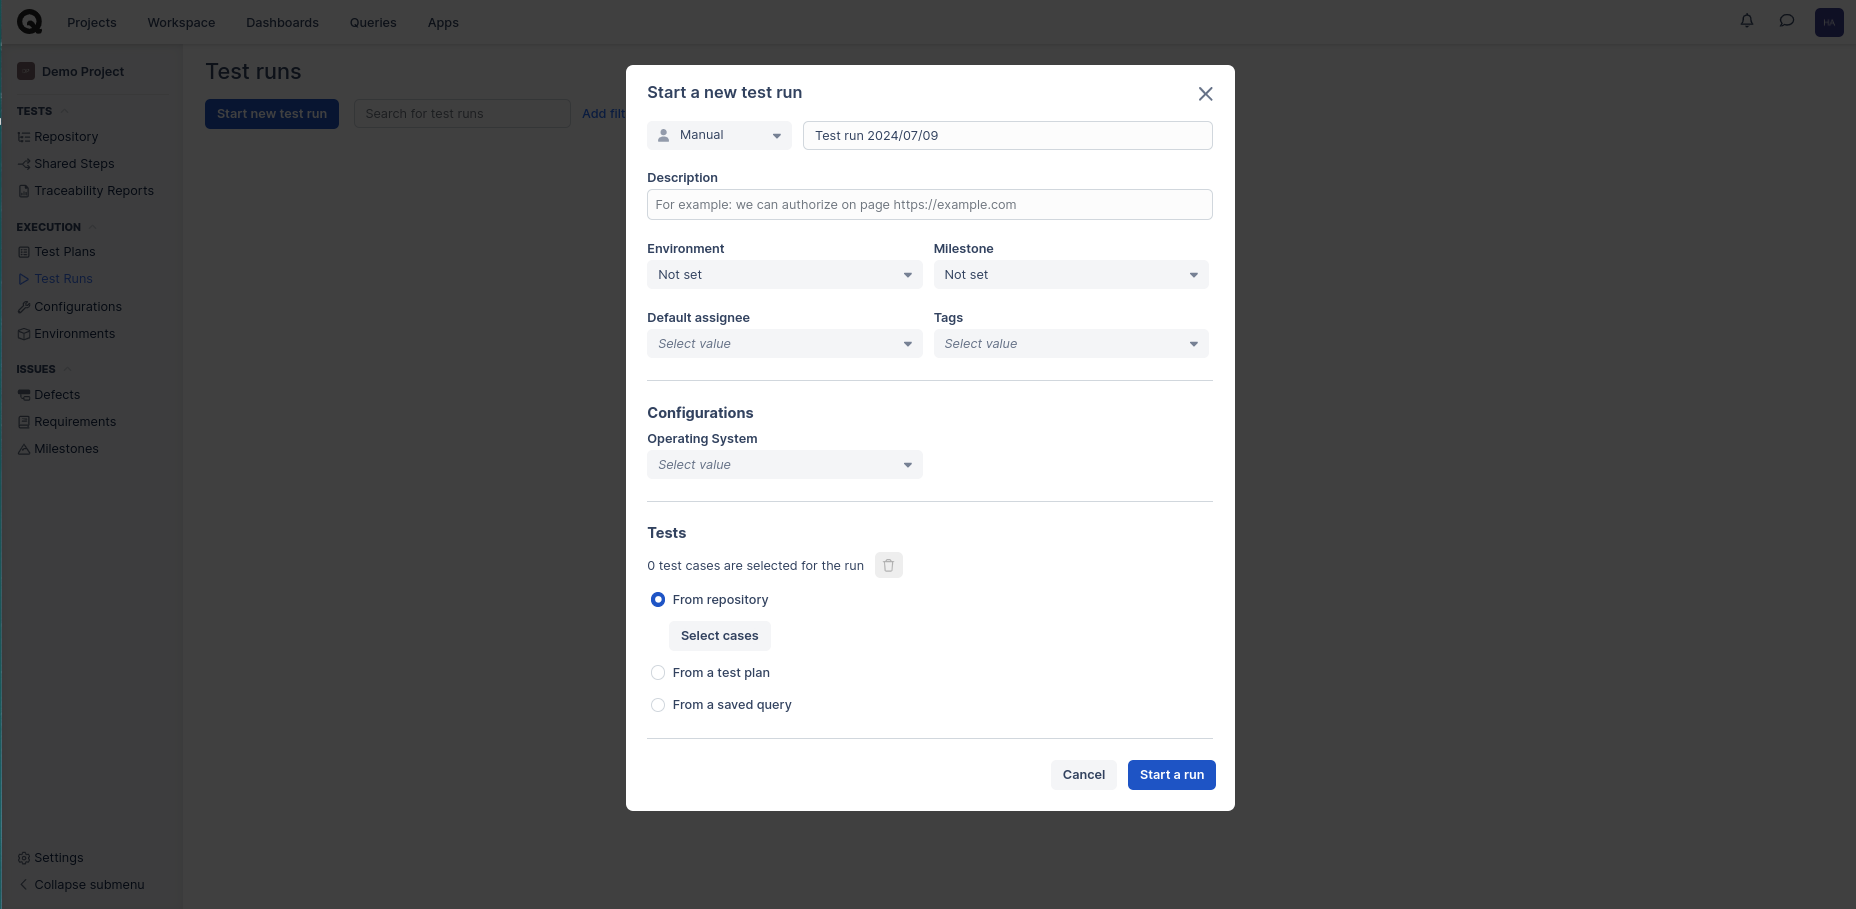
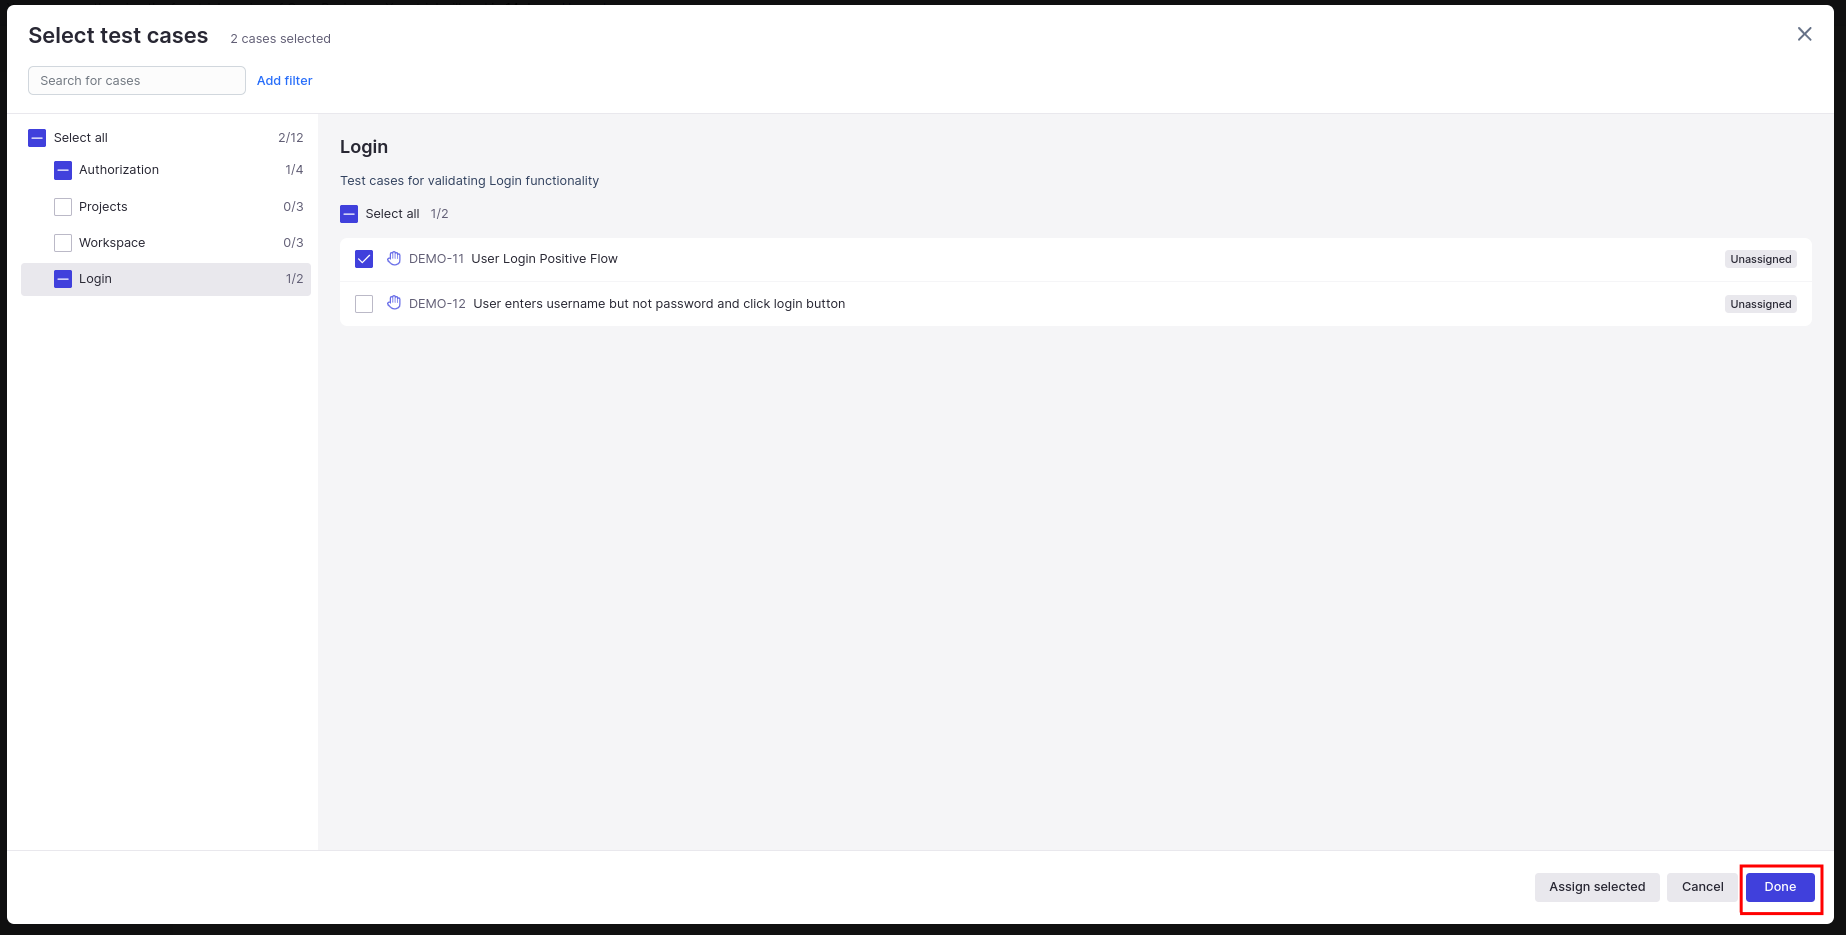
Step 13: For selecting test cases, you can either select the whole suite or select test cases from different suites. Once you choose the test cases, click Done.
Step 14: After selecting test cases and filling in all details, click the “Start a run” button.
View Reports
Step 15: Open the corresponding test run and click on each test case to update the test result. You can also update the single-step status and the test case status.
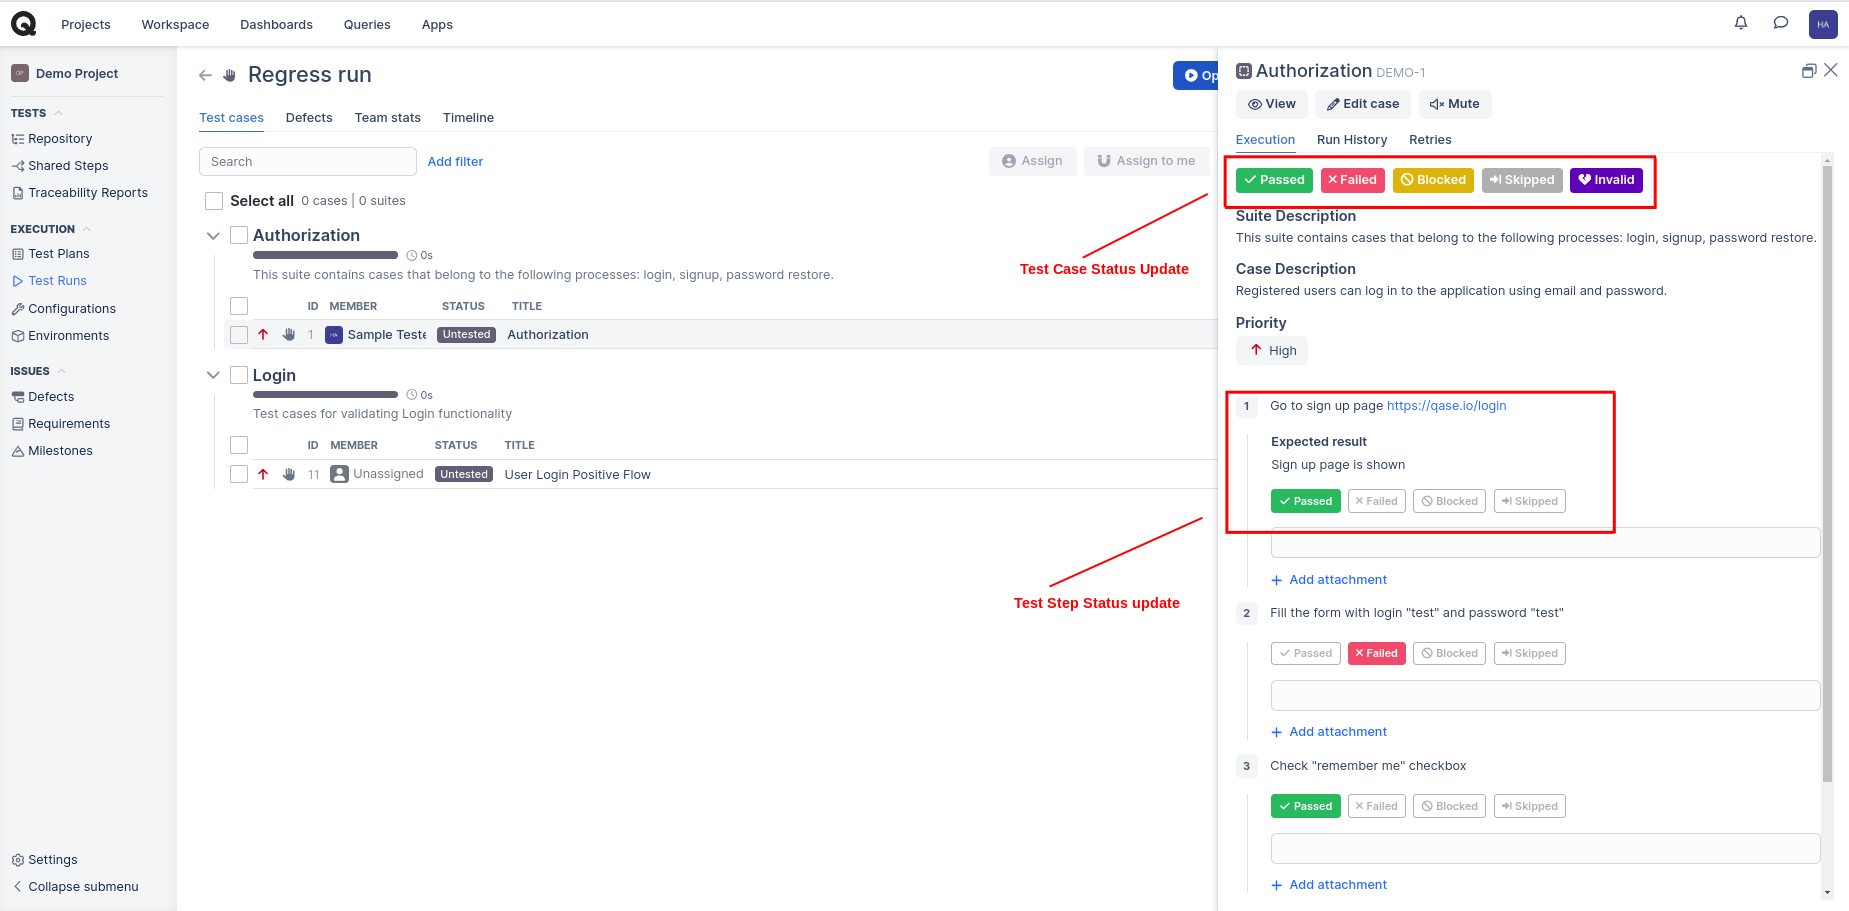
Step 16: On the Test Runs main page, you can see the status of the test run, showing the test case pass and fail count.

Challenges with Qase
- Large Data Handling: For very large projects with extensive test cases and data, Qase might experience performance slowdowns. Managing and navigating through vast amounts of data can become cumbersome and impact overall efficiency.
- Tool Compatibility: Integrating Qase with existing tools and workflows can sometimes be challenging. Ensuring compatibility with various CI/CD pipelines, automation frameworks, and issue-tracking systems may require additional configuration and troubleshooting.
- Subscription Costs: For smaller teams or startups, the subscription costs of Qase might be a significant consideration. Balancing the cost against the benefits provided by the tool is crucial, especially for budget-constrained projects.
- Advanced Reporting: While Qase provides customizable reports, there may be limitations in advanced reporting capabilities compared to other specialized reporting tools. Teams with highly specific reporting needs might find the built-in options insufficient.
- Role-Based Access Complexity: Managing permissions and access control can become complex in larger teams with diverse roles and responsibilities. Ensuring the correct access levels for different team members requires careful setup and ongoing management.
- Limited Support Availability: Depending on the subscription level, access to support might be limited, which can be problematic when encountering urgent issues or needing quick resolutions.
Conclusion
Qase is a powerful test management tool that significantly enhances the efficiency, collaboration, and visibility of QA processes, making it a valuable asset for software development teams of all sizes. Its comprehensive features, including detailed test case management, seamless integrations, and real-time reporting, offer substantial benefits in terms of productivity and quality improvement.
However, teams may face challenges such as the initial learning curve, integration complexities, and potential performance issues with large data sets. By addressing these challenges through careful planning and adequate training, teams can effectively leverage Qase to optimize their testing workflows and achieve higher-quality software releases.